This is an old revision of the document!
How to manage my addressbook using ROUNDCUBE
Manage contacts
Add a new contact
c) Please note the icons over the Contacts section,
click on the first icon [ Create new contact card ].

d) The section Add new contact will appear on the right.
- PLEASE NOTE, fill in ALWAYS at least one the following two fields:
- 1) First Name (for example Adam);
- 2) Last Name (for example Smith);
- 3) in the Contact properties tab;
- 4) fill in the E-Mail Home/Work/Other field (compulsory) (for example adamsmith@crono.it);
- 5) At the end, click on Save.
{a3n.jpg|Fill in carefully this window…}}
c) The roundcube webmail service will inform you that the new contact is “ Successfully saved ”.
You can find the new contact in the Contacts section.
Manage (edit/delete) a contact
For edit or delete an existing contact, you have to
execute the commands in the Address Books window (sections), so
these are the first steps to activate this window.
Edit a contact
In the Contact properties section, click on Edit contact,
then your will be able to modify the fields of the selected contact.
At the end save your changes clicking on Save.
Delete a contact
After selecting the contact name to delete,
look for a RED prohibition sign over Contact section, it is third icon [ Delete selected contacts ],
click on it .
The roundcube webmail service will ask you to confirm the operation, click on OK.
After this, the previously selected contact name does not appear any longer in your Contact section.
Manage contact groups
Create a new group
First you have to insert/create all contacts you wish to insert in your new contact group (please read the section Add a new contact at the beginning of this page).
c) Click on the plus sign [ Create new contact group ] located on the left button of the Groups section.

d) In the Groups section a white field will appear,
write in it your new contact group name (in the example colleagues).

e) The roundcube webmail service will inform you: “ Group created successfully ”.
You can find the new contact group in the Groups section (in the example colleagues).

Delete a group
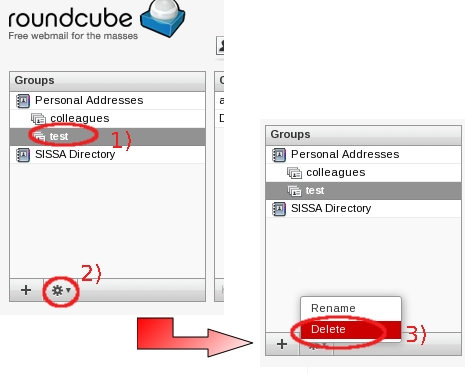
c) In the Group section:
- 1) select the contact group name to delete (in the example test);
- 2) look for a gear icon at the bottom of the Groups section and click on it,
- 3) a little drop down list will appear, select Delete.

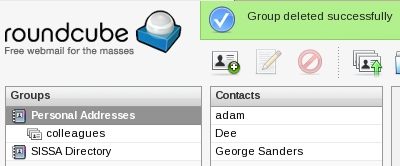
d) The roundcube webmail service will inform you: “ Group deleted successfully ”.

Manage contacts in/out a contact group
Add a contact into a group
c) In the Contacts section, select one of your contacts in the Contacts section, clicking on it (in the example George Sanders).
Please note: you can select more contacts keeping pressed <CTRL> button at the same time with the left button on the mouse.

d) Drag the selected contact (in the example George Sanders) to one of your contact groups (in the example there is only one group: colleagues).

e) The roundcube webmail service will inform you: “ Successfully added the contacts to this group ”.

Remove a contact from a group
c)
- 1) In the Groups section, select the contact group name on which you have to operate (in the example colleagues);
- 2) then in the Contacts section, select the contact that you wish to remove from the preselected contact group (in the example adam).

d) In the Contact properties section:
- 1) select the Groups tab of the preselected contact;
- 2) then remove the check in the contact group name box corresponding to the group from which you have to remove this contact (a contact could be inserted in more of a group);
- 3) the roundcube webmail service will inform you: “ Successfully remove contacts from this group ”.
e) At the end, if you wish, you can check the contacts present in a contact group, clicking on its name in the Groups section.


