This is an old revision of the document!
SOGo Calendar web interface overview
Connect to address https://calendar.sissa.it and login with your account credentials.
 This is an image of the calendar main window with default configuration.
To enlarge this image, click on it.
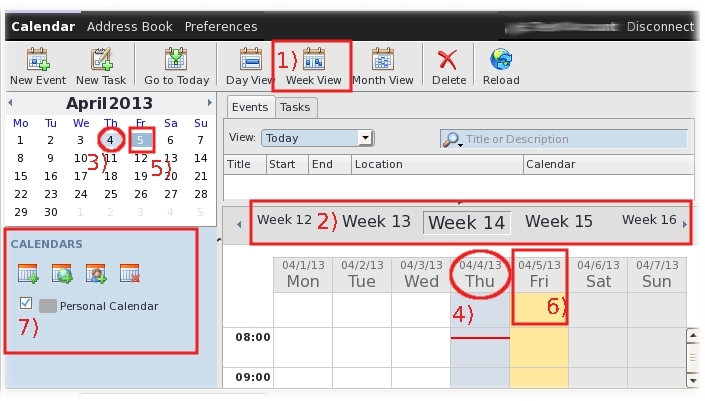
Please look at the following example image and try to do the suggested tests on you calendar web page.
- VIEW:
- 1) we selected Week View,
- 2) so you can display a specific week selecting a week number (in the example it is selected Week 14).
- Try to select different views (Day View and Month View) to see the different kind of display available.
- DAYS:
- 3 - 4) in the example today is the 4th of April, so in both positions you can see a pale blue background. The horizontal RED LINE indicates the actual time (8.15).
- 5 - 6) in the example the selected day is the 5th of April, in the right calendar (5) you can see a darker pale blue background, while in the “large” calendar (6) there is a yellow background. Try to select another day by clicking on it to see what happens.
- 7) CALENDARS area, by default only the Personal Calendar is present, but you can add other calendars too. You will find more information about calendar managing in the Calendars section on this page.
Event management
Create / Modify an event
- To CREATE an event: select New Event icon at the top left… an event window for setting a new event will open. By default events will appear in the view as a rectangular box with a dark gray background.
- To MODIFY an event: double-click on it.
Event window
When you create or modify an event, an event window will appear to set/change its fields and options.
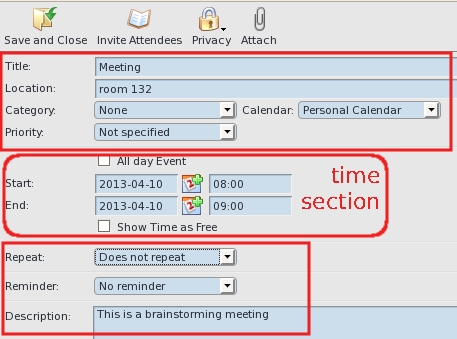
- Title: write a name for this event (example: Meeting).
- Location: - optional - location of this event (example: room 132).
- Category: - optional, default value None - it could be useful only if you, changing your Preferences, customize your category list assigning a specific color to each category you wish to use.
 On the right, you can see an example with the event meeting2 associated to the category Ideas marked in “green” and the Meeting event not associated to any category. About preferences management, please see the Preferences section on this page.
- Priority: please ignore this option.
- Calendar: if you have more calendars, choose carefully to which calendar this event belongs to. WARNING: by default the program set the selected calendar, you can change the default settings changing your Preferences.
In the “time” section of the event window, you can set the duration of the event.
- If this event lasts the all day, you have to put a check in the box next to All day Event. The event will be displayed ONLY at the top of the calendar below the relative day/s.
- If this event has a certain duration in time, please use the Start date and time & End date and time fields. Clicking on any of these fields, a table to help you in the selection will appear.
 In this small image, there are two kind of events; 1) “Roma” is an All day Event event (two days on 12th & 13th of April) and 2) “meeting” is an event from 10:10 to 12:15 (4th of April). To enlarge this image, click on it.
- Show Time as Free: - optional - if you put a check in this box you will appear free from commitments in case another SISSA user would invite you to participate at his event. Be aware that if the access rights of your calendar deny any kind of access to third users, for them you will appear free at any time.
Now the last three options.
How to set an alert as a reminder for this event.
- Reminder: the default value of this option is No reminder. To set an alert you can choose a “Standard” reminder or a Custom reminder.
- “Standard” reminder: the program offers some standard reminders, from a few minutes to a week before the event. These kind of reminders show you a pop up alert ONLY if you are logged on the calendar web page.
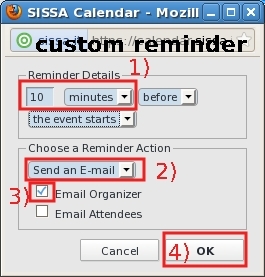
- Custom reminder: you may setup a custom reminder to send an e-mail alert choosing the Custom option. A new little window will appear. In our example we: set 1) 10 minutes before, choose 2) Send an E-mail, put a check on Email Organizer, then confirmed 4) these options clicking on OK button. In this way, ONLY the “owner/creator” of the calendar to which this event belongs, will receive an e-mail reminder.
- Description: - optional - detailed text description of the event.
Click on Save and Close on the top left of the window to activate the event or to confirm any changes.
Event window: Share an event
 Be aware that to share an event with other users using a shared calendar (NOT your Personal Calendar), you have to set correctly the access rights of the shared calendar to which the event belongs. To check and eventually change the access rights please see the access rights page.
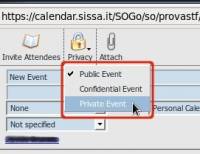
If the access rights have been already correctly set, you can choose among three privacy classification options: Public Event (this is the default option), Confidential Event, Private Event.
To change the privacy classification of the selected event click on Privacy in the event window toolbar.
Event window: Attendee Invitation
- You can send an e-mail inviting one (or more) SISSA user or an external user to participate at the selected event clicking on Invite Attendee in the Event window toolbar.
- You can reply to a SISSA Attendee Invitation trough your SISSA calendar too.
For more information please go to Event window: Attendee Invitation page.
Delete an event
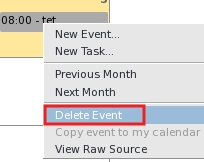
To DELETE an event: click on the event using the right button of your mouse, a drop down window will appear, then select Delete Event.
Manage display events
- To DISPLAY more information about a specific event, click once on it (see 1) in the example).
- To DISPLAY more information about all events included in a “chosen time frame” change the View: option. The default option for View: is Today. — In the following example the view option Next 7 Days has been marked with 1a). The conference event information appears in the View section (below 1a mark), because this event is included in the “Next 7 Days” time frame (today's date is the 2nd of April).
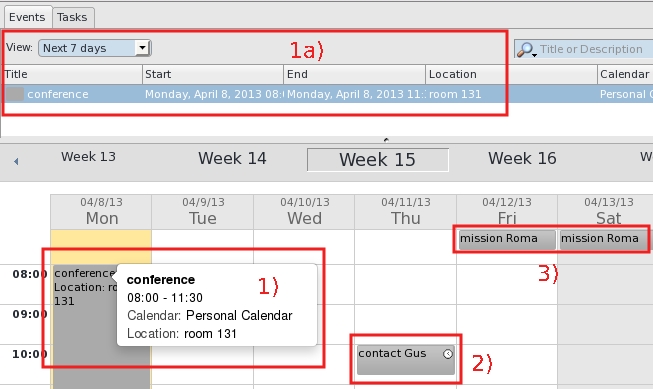
In this example, you can see two other kind of events:
- 2) an event with a standard reminder (marked by a little clock in the event box). Please remember: a pop-up window will show you the reminder ONLY if you are logged on the calendar web page.
- 3) an All day Event event. In the example: a two days event titled Mission Roma with the All day Event option activated, for this reason this event is displayed at the top of the calendar.
I you find an event surrounded by a “dotted line”, this means that someone has invited you to participate at his/her event. More information on the page How to reply at an attendee invitation.

Display events of more calendars
The list of your calendars is on the left of the main window.
By default only the Personal Calendar is present, but you can display –at the same time– events contained in other calendars (either yours or other users calendar shared with you)
PUTTING a CHECK in the square boxes next to their name.
If you remove the check from a “calendar name square box”, the events contained in that calendar will be hidden.
To add new calendars please see the Adding calendars page;
to subscribe an other user's shared calendar see the Add calendars shared by other users page.
Please look at the following two examples:
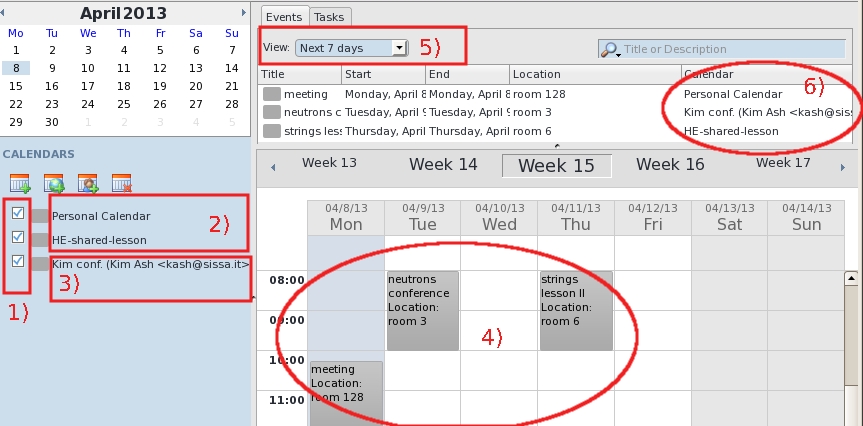
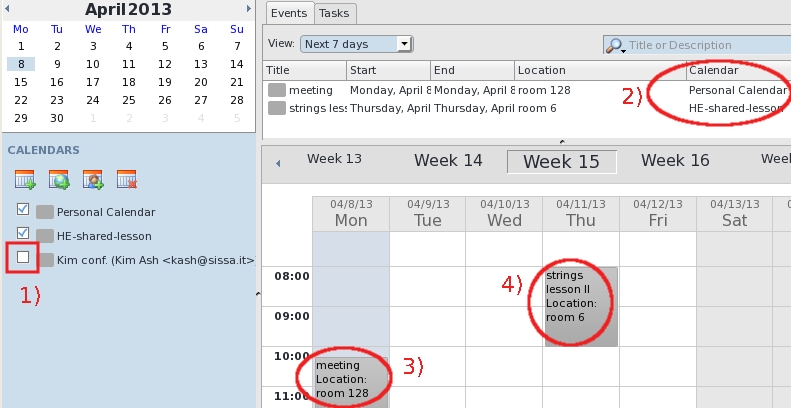
- 1) we put a check in each square box next to each calendar names, so all events from all calendars are displayed,
- 2) the user HE has his Personal Calendar and a HE-shared-lesson calendar (shared with other users);
- 3) the user Kim Ash shared his calendar named Kim conf. with the user HE, so HE user can see its content;
- 4) three events (one for each calendar) are displayed;
- 5) to understand at which calendar an event belongs to, you can click once on it, or you can change View option as shown in the window below, where we set Next 7 days view, so …
- 6) in the view area you can see the calendar name each event belongs to.
- 1) now we have removed the check from Kim conf. calendar square box, so neutrons conference event is no more displayed;
- 2) in the view area, you can see ONLY two events which belong to Personal Calendar and to HE-shared-lesson;
- 3) & 4) in the main calendar area you can see ONLY two events as well.
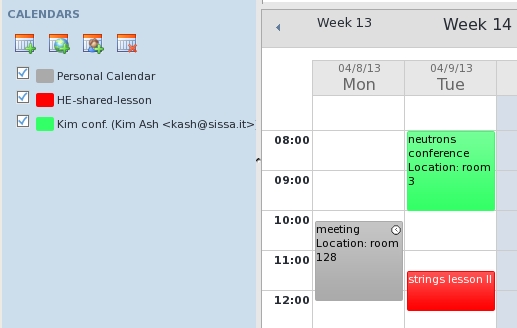 To improve the view of events belonging to different calendars, you can assign each calendar a different color.
So each event will have as background the color of the calendar at which it belongs.
Please see the Calendar properties section on this page to change the color assigned to a calendar.
This is an example with three events belonging to three different calendars.
Calendars
The list of your calendars is on the left of the main window.
By default only a Personal Calendar is present, but you can:
- add other calendars, useful to manage different activities. More information on the Adding calendars page;
- share a calendar with other users, in order to coordinate common events. More information on the Sharing calendars page;
- subscribe shared calendars created by other users, if you have sufficient access rights (read access at least), you can subscribe other users' calendars and a least read their content. If it is necessary, you can unsubscribe a calendar shared by other users from your calendar list. More information on the Add calendars shared by other users page.
You can display at the same time the content of one or more calendar. You can display, at the same time, one or more calendar putting a check in the square boxes next to their name. More information on Display events of more calendars section on this page.
Calendar properties
Generally you need to access a calendar properties:
- to change the color of the selected calendar or
- to manage the selected calendar using other programs (for example: Thunderbird with Lightning plugin).
To display/modify a calendar properties double-click on the calendar name in the CALENDARS area on left of the window. You can obtain the same result, if you right-click on the calendar name and then select Properties from the drop down menu.
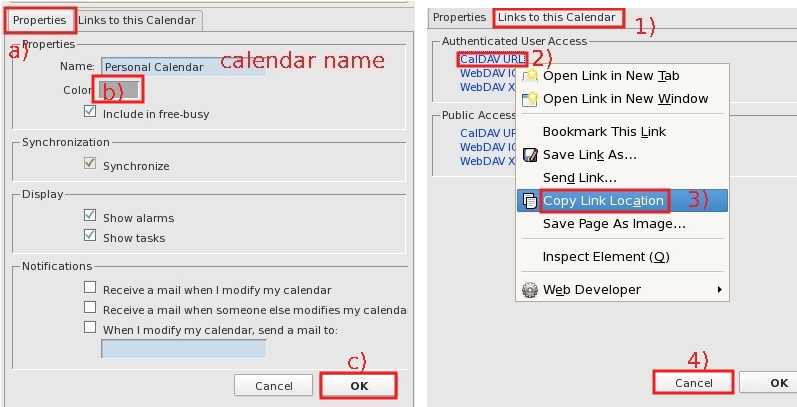
In the following example on the left you can see a Properties tab, on the right a Links to this Calendar tab.
- a) The Properties tab contains: calendar name, calendar color, etc…;
- to change the color of the selected calendar, click once b) in its color box. A little window which contains all available colors will appear, choose one of them. Then confirm your choice clicking on c) OK button on the right bottom of the Properties tab. To activate the new color, it could be necessary Disconnect (close) your calendar web page, then re-open it logging in again.
- 1) The Links to this Calendar tab contains links (URLs) of the calendar;
- you need CalDAV URL ONLY to manage one of your calendars using other programs (for example: Thunderbird with Lightning plugin). To copy the 2) CalDAV URL link, right-click on it and select 3) Copy Link Location from the drop down menu. Then close this window clicking on the 4) Cancel button on the right bottom of the Links to this Calendar tab. If you need to manage two or more of your calendars using other programs, you have to copy the CalDAV URL of each one. To manage one or more of your calendars using Thunderbird, please see the Access calendars using Thunderbird with Lightning plugin page.
Preferences
To change your preferences, select Preferences on the black top toolbar.
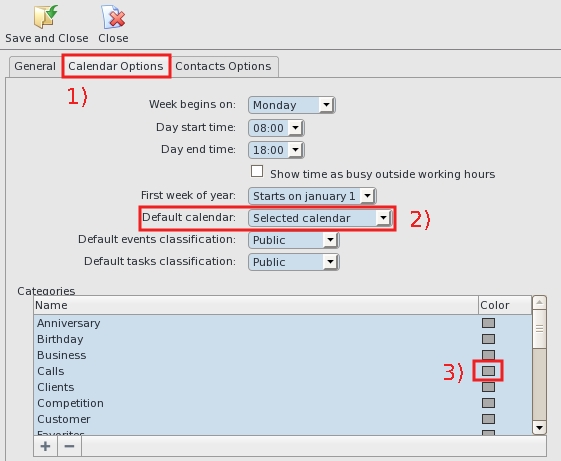
You will find three tabs: General, Calendar Options, Contact Options.
In the following example we select the 1) Calendar Options tab, which contains the most interesting options:
- 2) Default calendar default value Selected calendar) … when you are creating an event, the program assigns it to the selected calendar (the one which is highlighted in the CALENDARS/ area on the left with a darker blue background). If you wish, you can change this option in order to set as default Personal calendar… obviously during the event creation/modification you can choose any calendar available. * 3) To change the color assigned to a category, double click on its (gray default) colored box, it will appear a little window which contains all available colors. Choose one of them. * To save any change and close the preference window, click on Save and Close in the top left.
