This is an old revision of the document!
Event window: Attendee Invitation
Activate an Attendee Invitation
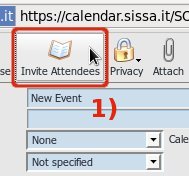
You can send an e-mail to invite one or more SISSA users or external users to participate at the specific event clicking on Invite Attendee on the Event window toolbar .
This e-mail include CalDAV event objects, if the invited users use SISSA calendar or an external calendar program, he/she can confirm his attendance selecting this event on his/her calendar (generally from his/hers Personal Calendar) or on a calendar shared with the meeting organizer.
To invite participants follow those steps during creation or modification of the event:
- 1) click on Invite Attendee icon in the toolbar of the event window:
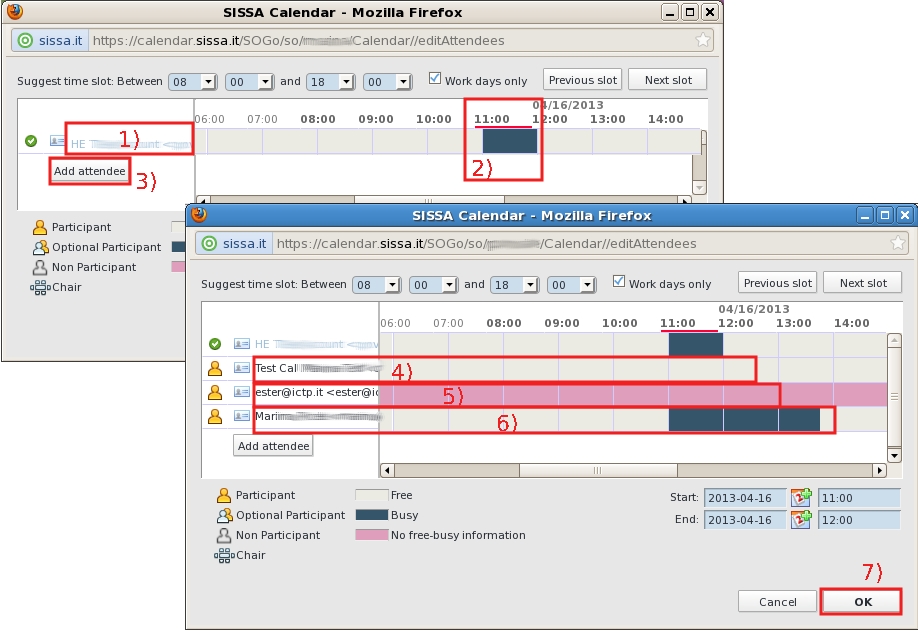
Another dialog window appear:
- 1)the first field on the left contains organizer's name and e-mail address (in the example it start with “HE” the last part has been deleted for privacy);
- 2) the red line is the actual time, the blue rectangle is the time reserved to the event;
- 3) click on Add Attendee to insert attendee e-mail address;
- on the left the dialog window will change, allowing you to insert attendee e-mail addresses. Add how many attendees as you need … You should modify the participant type clicking on the icon positioned on the left of the name.
- In the following example…
- 4) the second field contains a SISSA e-mail address and it is followed by grey color because this SISSA attendee is free or he wish appear as free (he activated the Show Time as Free option in his events taking place at the same time frame).
- 5) the third field contains an external e-mail address, and it is followed by pink color because it is not possible for the program check if he is busy or free;
- 6) the fourth field contains a SISSA e-mail address of a user let the organizer to check if he is free or not during the frame time of the event. So the gray colored area indicate free hours, blue area indicate busy hours because
- 7) To confirm the attendees list clicking on OK button, but IF there is not one conflict between your event timetable and the busy timetable of the attendee, this window will be closed, OTHERWISE….
If there is one ore more timetable conflicts you have to confirm or not the attendee list bif
In the event window now appear the attendants names (or an e-mail address if it's an external account). On the top left of the event window click on Save and Close to activate the event or to confirm any changes.
RETURN to SOGo Calendar web interface overview mainpage.
How to reply at an attendee invitation
THIS SECTION IS UNDER CONSTRUCTION!!
If some invite you to be present at one of his event (for example for a lesson), you will receive an e-mail containing the information inserted in this event.
From the main calendar window, you will see the event you have been invited surrounded by a “dotted line”.
If you share a calendar with the user which manage the lessons, this event will belong to this shared calendar, otherwise it will belong to your Personal Calendar.
Obviously the content of every calendar is displayed only if there is a check in the square box next to its name. RETURN to SOGo Calendar web interface overview mainpage.

