SISSA-WiFi Windows 7 configuration guide
Configuration guide to the SISSA-WiFi Wireless Network, using the default tools and drivers of Microsoft Windows 7.
You have two possibilities to configure the wireless network card for internal SISSA use:
- the first one is the shortest and easy, but you have to install the SISSA certicate, to use this procedure please go to the section Configure wireless using SISSA certificate on this page;
- the second one is longer but you can use it, if you have any problem using the first one. For the second procedure please go the the section Extended guide to configure wireless on this page.
Configure wireless using SISSA certificate
Configuration guide to the SISSA-WiFi Wireless Network, installing the SISSA certificate on Microsoft Windows 7.
a) Download the SISSA certificate:
click here to DOWNLOAD SISSA certificate.
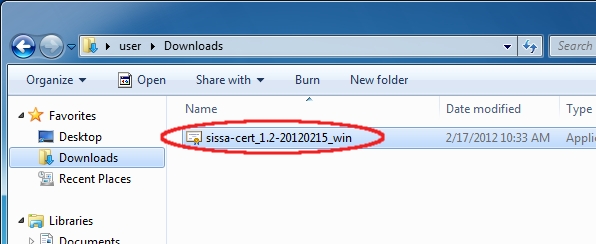
b) Search for the downloaded file sissa-cert_1.2-20120215_win icon and execute it (double click).
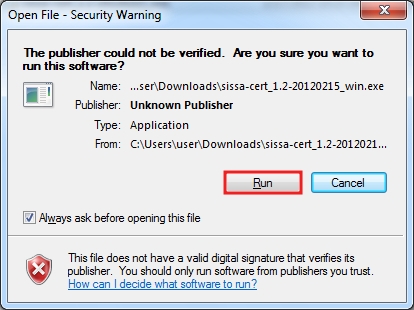
c) On the Open File - Security Warning window:
to allow the installation process, click on Run.
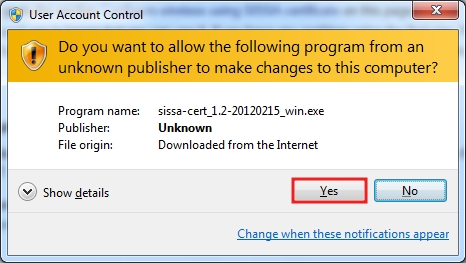
d) On the User Account Control window:
click on Yes.
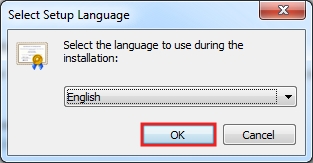
e) On the Select Setup Language window:
click on OK.
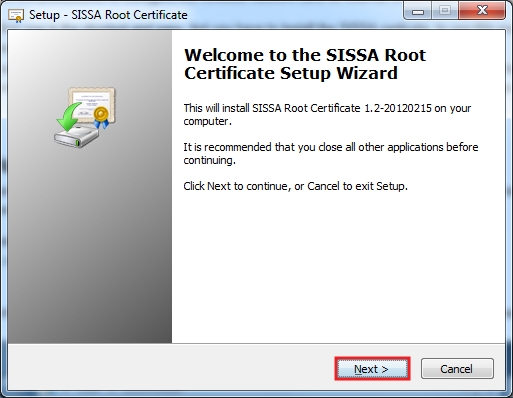
f) On the Setup - SISSA Root certificate window:
click on Next.
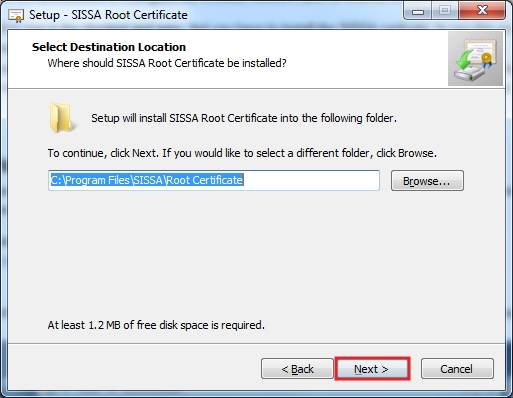
g) On the Setup - SISSA Root certificate window, Select Destination Location section:
click on Next.
h) On the Setup - SISSA Root certificate window, Select Additional Tasks section:
click on Next.
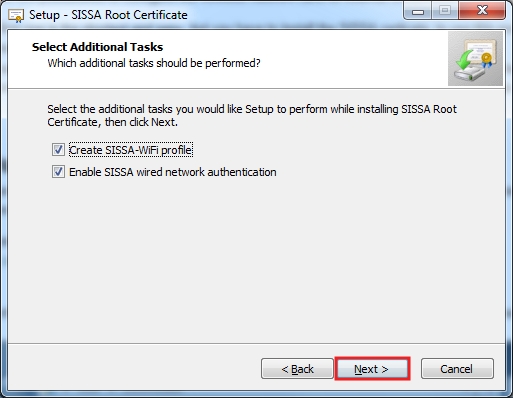
i) On the Setup - SISSA Root certificate window, Ready to Install section:
click on Install.
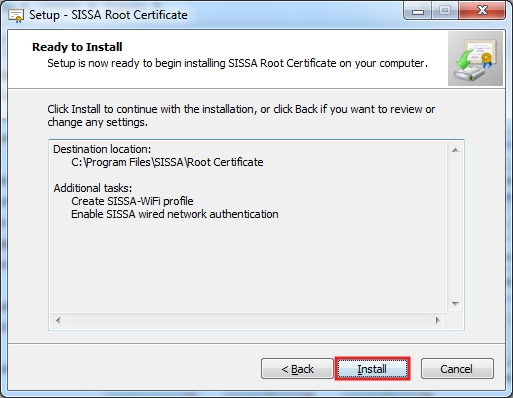
j) On the Setup - SISSA Root certificate window:
click on Finish.
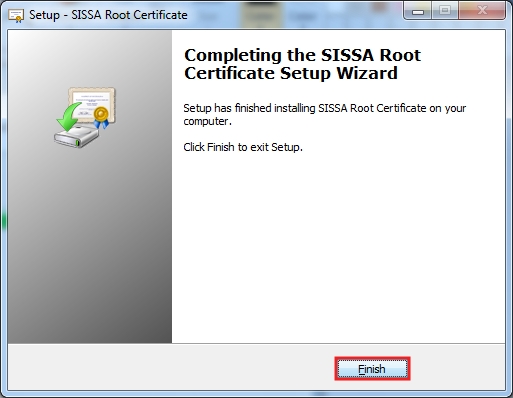
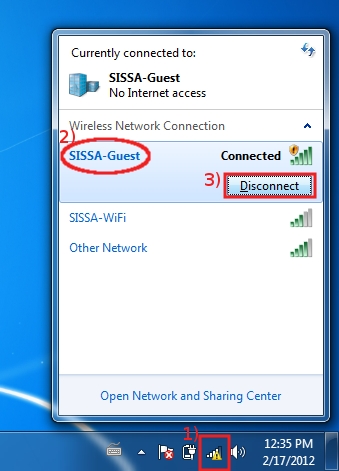
k) Disconnect from the SISSA-Guest network. In the Notification area (bottom-right corner of the Desktop):
- 1) click on the Wireless Network icon;
- 2) then select the SISSA-Guest network connection;
- 3) and click on Disconnect.
l) In the Notification area (bottom-right corner of the Desktop) a pop-up window will appear:
Click on the pop-up window to provide additional information.

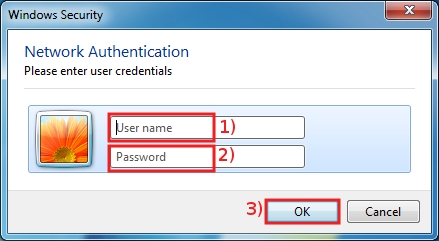
m) In the Windows Security window:
- 1) in the field where is written: User name, replace the text inserting your SISSA username
- 2) and in the field where is written: Password, replace the text inserting your your SISSA password
- 3) then click OK
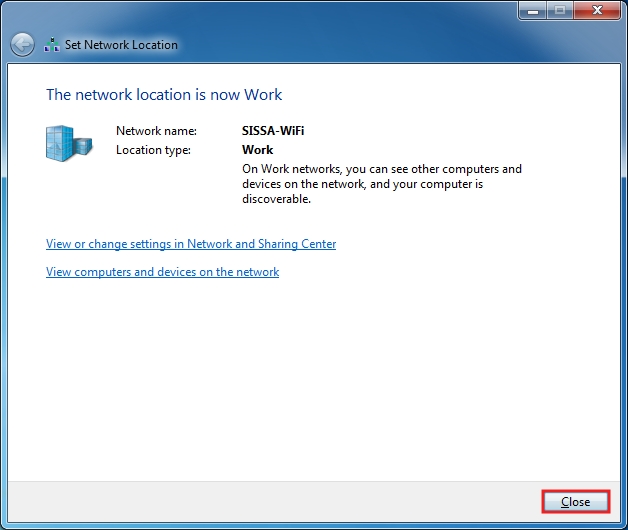
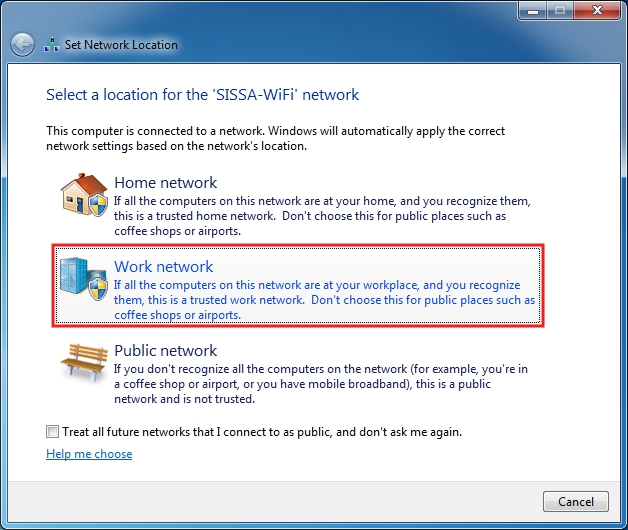
n) In the Set Network Location window:
Select Work Network.
o) In the Set Network Location window:
END OF “Configure wireless using SISSA certificate” GUIDE
Extended guide to configure wireless
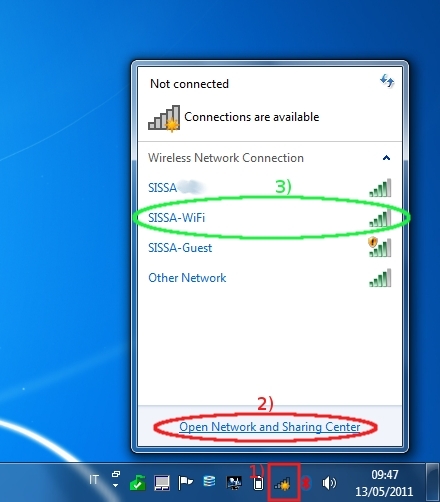
a) Switch on your wireless network card, then in the Notification area (bottom-right corner of the Desktop):
- 1) click on the Wireless Network icon;
- 2) then click on the Open Network and Sharing Center;
- 3) verify that SISSA-WiFi network is available (this is possible only if you are in SISSA wireless range).
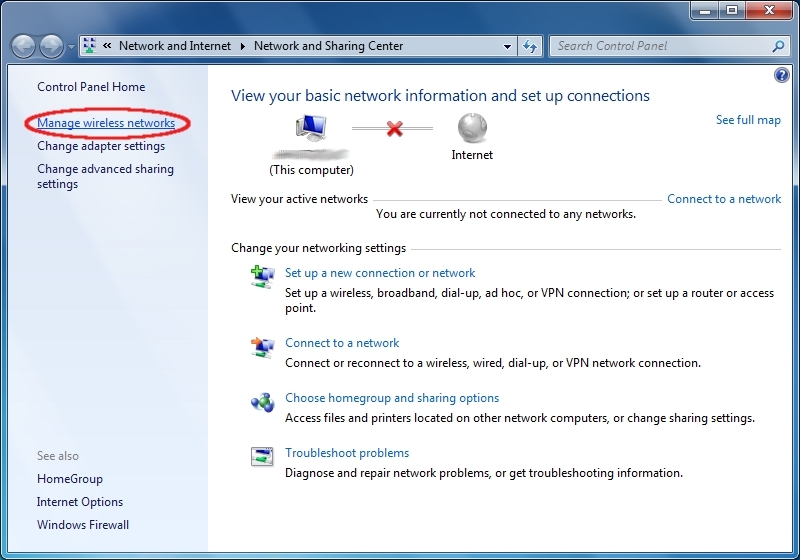
b) In the Network and Sharing Center window, on the left side:
click on Manage wireless networks.
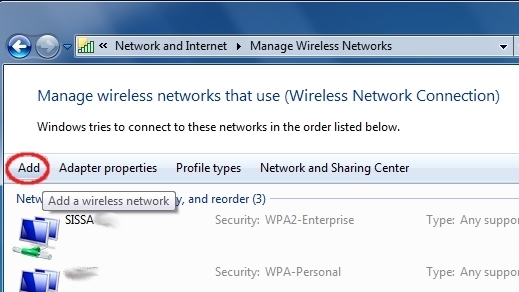
c) In the Manage wireless networks window:
click on Add.
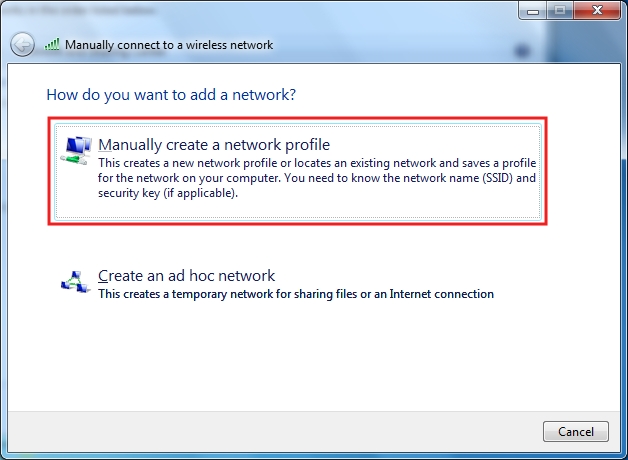
d) In the Manually connect to a wireless network window:
select Manually create a network profile.
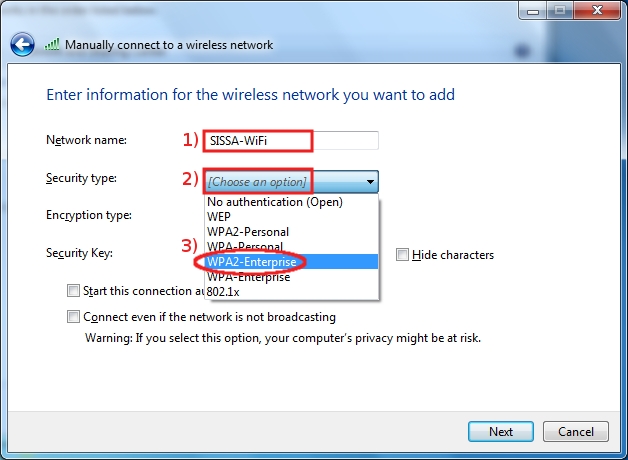
e) In the Manually connect to a wireless network window:
- 1) in the Network name: field write SISSA-WiFi
- 2) expand the Security type: drop down list;
- 3) select WPA2-Enterprise.
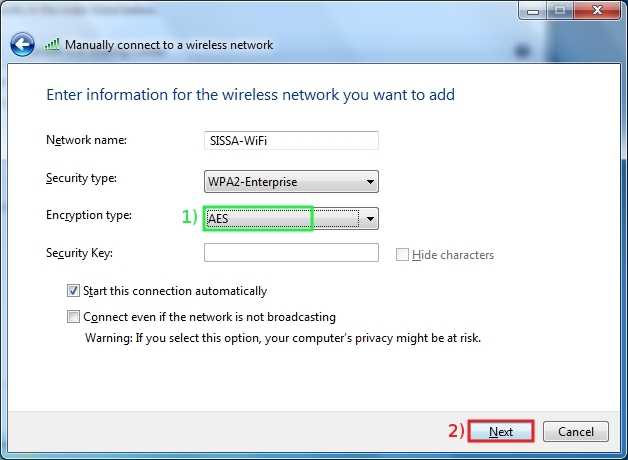
f) In the same Manually connect to a wireless network window:
- 1) … verify that the Encryption type: drop down list AES has to be selected;
- 2) and then click on Next.
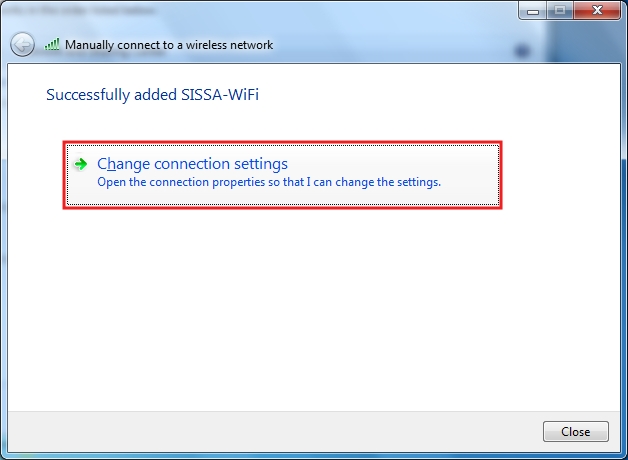
g) In the Manually connect to a wireless network window:
click on Change connection settings.
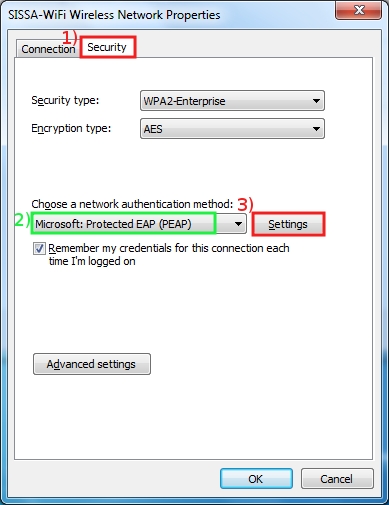
h) In the SISSA-WiFi Wireless Network Properties window:
- 1) click on Security tab;
- 2) verify that the Choose a network authentication method: drop down list Microsoft: Protected EAP (PEAP) has to be selected;
- 3) then click on Settings.
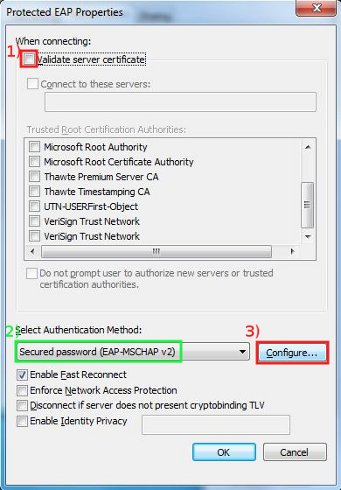
i) In Protected EAP Properties window:
- 1) remove the check in Validate server certificate box;
- 2) verify that theSelect Authentication Method: drop down list Secured password (EAP-MSCHAP v2) has to be selected;
- 3) click on Configure….
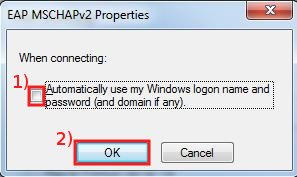
j) In EAP MSCHAPv2 Properties window:
- 1) remove the check in Automatically use my Windows logon name and password box;
- 2) click OK on this window and in Protected EAP Properties window (step i) too.
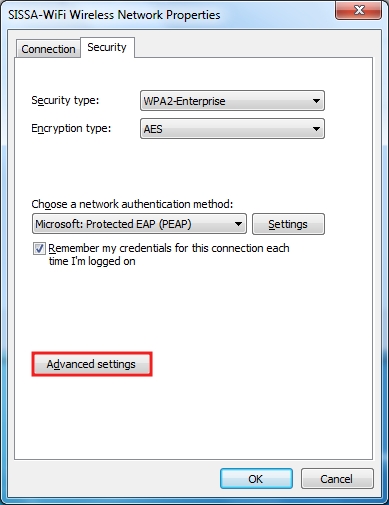
k) In the SISSA-WiFi Wireless Network Properties window, Security tab:
click on Advanced Settings…
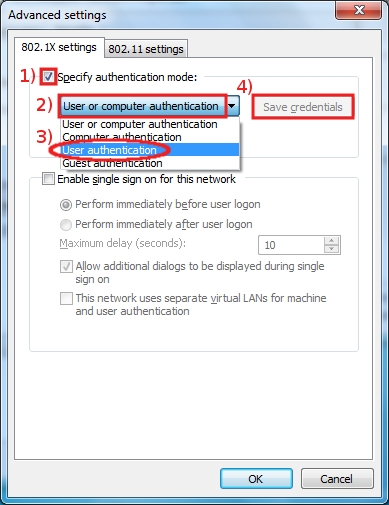
l) In the Advanced settings window:
- 1) put a check in Specify authentication mode: box;
- 2) expand the User or computer authentication drop down list;
- 3) select User authentication;
- 4) then click on Save credentials.
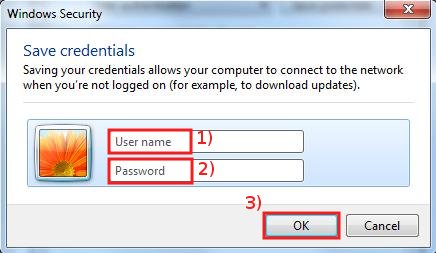
m) In the Windows Security window:
- 1) insert your your SISSA username
- 2) and insert your your SISSA password
- 3) then click OK here and in ALL windows, except in the Manually connect to a wireless network window where you have to click on Close (in order to save and confirm all settings).
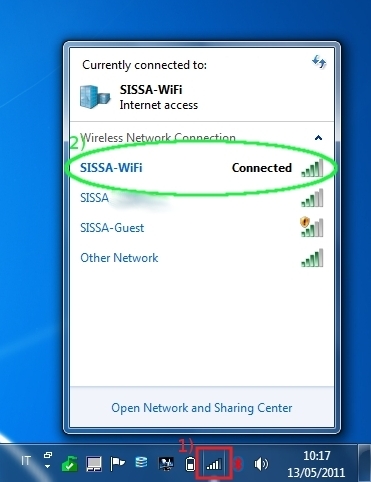
n) To verify your connection in the Notification area (bottom-right corner of the Desktop):
- 1) click on the Wireless Network icon;
- 2) verify that you are currently connected to: SISSA-WiFi.
