This is an old revision of the document!
How to install and configure vpn client on your Linux
Due to security reasons, this page is readable outside the SISSA network inserting your SISSA username and password. There are no restriction inside the SISSA network.
Ubuntu
Since Ubuntu is the most common distribution for personal laptops or desktops we are giving you instructions on how to use it with ubuntu system tools.
The instructions refer to Ubuntu 9.04 and Gnome Desktop in english using Network Manager (the applet controlling the network connections).
a) Install the cisco vpn client for Network Manager typing in a terminal:
sudo apt-get install network-manager-vpnc
The system will ask you for your SISSA password and prompt for confirmation.
b) Unless the previous command states the package was already installed, to be on the safe side, reboot your machine,
c) log in again and
d) Open the Network connections window, on the main top bar menu:
- 1) click on System;
- 2) click on Preferences;
- 3) click on Network connections.

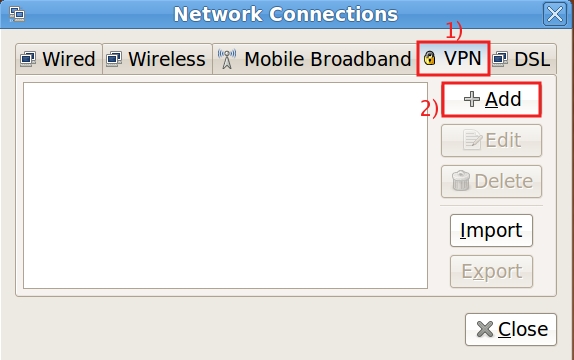
e) In the Network connections window,
- 1) select VPN tab and then
- 2) click on Add.
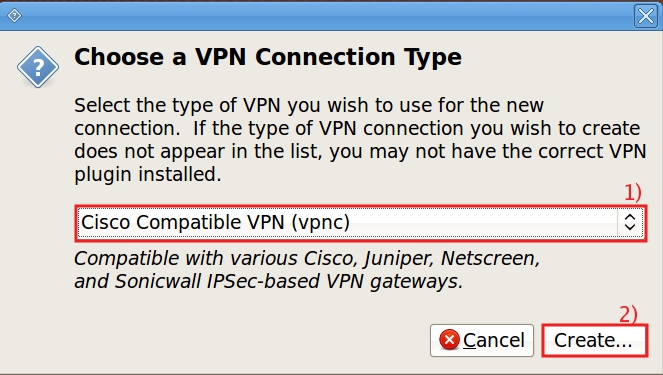
f) In the Choose a VPN Connection Type window,
- 1) in the drop down list select: Cisco Compatible VPN (vpnc) and then
- 2) click on Create.
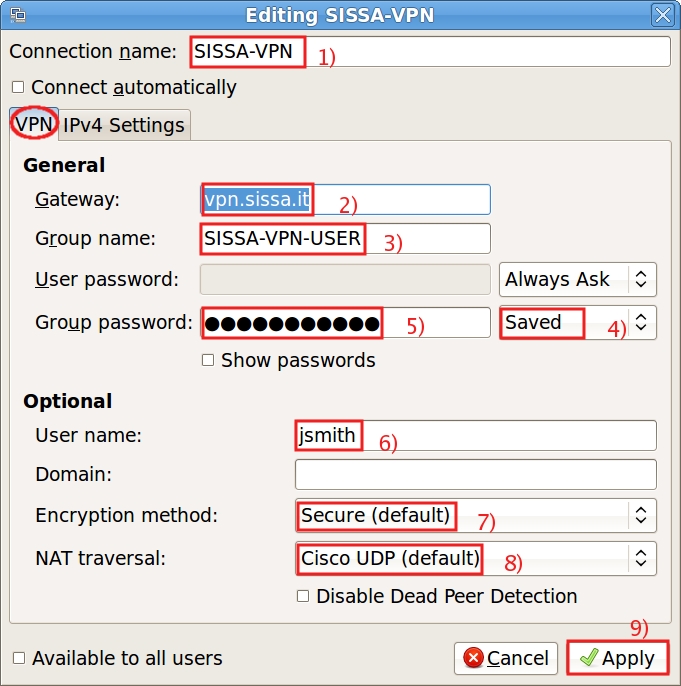
g) In the next window:
- 1) write in the field Connection name: SISSA-VPN (the window name will change automatically to Editing SISSA-VPN),
in the VPN tab, General section:
- 2) write in the field Gateway: vpn.sissa.it
- 3) write in the field Group name: the group name provided by helpdesk: SISSA-VPN-USER
- 4) in the drop down list in the same line of Group password, select Saved
- 5) write in the Group password field the vpn group password got on the VPN password page;
always in the VPN tab, Optional section:
- 6) in the User name: field write your SISSA username, for example jsmith;
- 7) check the Encryption method field: it has to be set to Secure (default);
- 8) check the NAT traversal field: it has to be set to Cisco UDP (default);
- 9) then click on Apply.
To activate the VPN session
1) On the main top bar menu:
- 1) find the Network Manager icon and click on it;
- 2) then on Wired Networks menu click on VPN Connections;
- 3) at the end in the last menu click on SISSA-VPN.
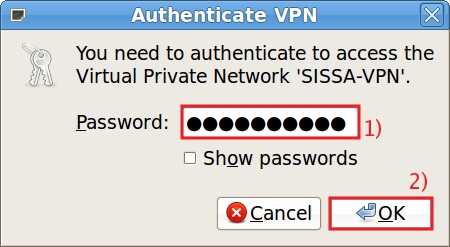
2) In the Authenticate VPN window:
- 1) write your SISSA password in the Password: field;
- 2) then click on OK.
To know how to open a connection to your linux SISSA workstation, please read the instructions on the page:
How to connect your laptop/pc to your SISSA workstation.
Please remember, when the VPN session is active, you will be able to act as a user connected in the internal SISSA network.
To disconnect the VPN session
Prior to disconnect the VPN, make sure you have closed all SSH and other connections towards SISSA services.
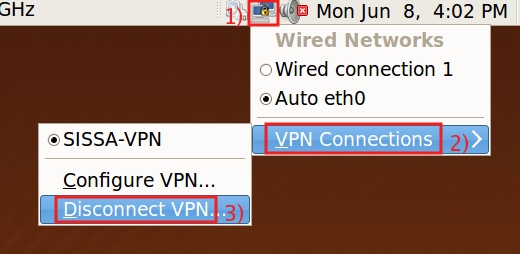
On the main top bar menu:
- 1) find the Network Manager icon and click on it;
- 2) then on Wired Networks menu click on VPN Connections;
- 3) at the end in the last menu click on Disconnect VPN.
Reference
Generic linux VPN client
To install the VPN client, you have to login as root (privileged account).
Download the Linux client, download the file in a new directory to avoid any kind of overwriting. This version of the software works on both 64 & 32 bits platforms.
Then extract the files using the command (the version can change):
tar xzf pnclient-linux…tar.gz
You need to have installed on your system the kernel headers and the gcc compiler, please refer to your distribution help on how to do it.
Check that the kernel headers you have installed are from the same version of your running kernel, and remember that in case of a kernel update the software has to be reinstalled.
Then go to the directory created and type:
cd vpnclient
./vpn_install
All default settings seem to work on Fedora Core 5, check for other distributions.
Then you need only to create/change the file /etc/opt/cisco-vpnclient/sissa.pcf as it follows:
- the vpn group name GroupName= have to be: SISSA-VPN-USER,
- as vpn group password GroupPwd= insert the one got on the VPN password page.
[main]
Description=sissa
Host=vpn.sissa.it
AuthType=1
GroupName=SISSA-VPN-USER
Username=
EnableISPConnect=0
ISPConnectType=0
ISPConnect=
ISPCommand=
SaveUserPassword=0
SaveGroupPwd=1
EnableBackup=0
BackupServer=
EnableNat=1
CertStore=0
CertName=
CertPath=
CertSubjectName=
CertSerialHash=00000000000000000000000000000000
DHGroup=2
ForceKeepAlives=0
UserPassword=
enc_UserPassword=
GroupPwd=
enc_GroupPwd=
ISPPhonebook=
NTDomain=
EnableMSLogon=1
MSLogonType=0
TunnelingMode=0
TcpTunnelingPort=10000
SendCertChain=0
PeerTimeout=90
EnableLocalLAN=0
To open the connection, always as user root, type:
vpnclient connect sissa
It will prompt for your SISSA username and your SISSA password.
To know how to open a connection to your linux SISSA workstation, please read the instruction on the page:
How to connect your laptop/pc to your SISSA workstation.
Please remember, when the VPN session is active, you will be able to act as a user connected in the internal SISSA network.
Another vpn client reported to work on linux is vpnc usually included in most linux distributions. With its graphic frontend kvpnc it is possible to import cisco profiles and connect in a maybe more user friendly manner.
